NOTE: in this exercise, do not edit any theme template files (ie don’t use Appearance > Theme Editor) or install any plugins.
Preliminary Site Setup
First please download the necessary files for the exercise (updated 2025, with classic blocks conversion).
If I ask you to install a Duplicator package instead, download this one (from August 2024).
Then, please
- unzip a WordPress download package,
- rename the folder shark-productions,
- create a new database,
- connect WordPress to that database, and
- activate the Twenty Twenty-One theme.
You may have to search for it to install it.
Next, go Media > Library > Add New and upload all the images that are in the Unsplash2020-Subways > Landscape folder, and ten of the images in the Faces folder.
Finally, go Tools > Import and import the content contained in the themingbasics.WordPress.2025-01-16.xml file.
In the Import dialog that comes up, don’t worry about assigning the posts to a new author. In other words, we will here import some content, but also some other site members.
Leave the “Download Attachments” button unselected. In a different exercise, you will download attachments, but not in this one. Attachments are just files inserted in, or linked to, you posts or pages: typically attachments refer to images, but can also include pdfs or other linked files, etc.
Once you have imported the content, go the the Posts area of the dashboard. Here you will see a bunch of posts. Trash the Hello World post.
Notice that they have authors, tags, and categories, which means that these were also imported into the site (as you can see if you go the Posts > Categories or Users, for example).
Task One: A New Menu
For this task, create a menu and place it in the menu location at the top of the page.
If you go to the Appearance area but don’t see a Menus item, it means that you have not yet activated the Twenty Twenty-One theme. Block themes make menus in a different way than Classic themes.
In the menu, include links to all the categories in the site (except Uncategorized, of course).
Task “One and a Half”: Remove Menu Output of Category Descriptions
In WordPress, menu items can have descriptions (like Category descriptions).
However, in this theme, their output is very clumsy, so figure out a way to remove them. This will not require CSS, but working in the Menu area of the Dashboard or Customizer.
Before:

After:

Task Two: Set a Static Home Page and a “Blog Page”
Make a new page called Home.
Now go to this online generator and generate five paragraphs of lorem ipsum text. Add an unordered list and headings when generating the lorem text.
Copy that content into the page called Home. Transform the first Heading in the copied content to a paragraph (when you copy it from the generator, that content is marked up as an H1).
In the Customizer area of the Dashboard (or in Settings), figure out how to set this new page as the home page for the site. When a home page does not contain a collection of posts, it is referred to as a static home page.
When you set a static home page, however, the automatic listing of your posts is obviously no longer found on the home page.
To remedy that, make a blank page called Blog.
In the Customizer (or in Settings), set that page to be where your posts are output.
Finally, add Home and Blog, respectively, to each side of the menu at the top of the page.
Check that the links work. If the Blog page starts with the default Hello World post, be sure to delete it.
Task Three: Add Feature Images
For each post, add a Feature Image. You can do that from the POST tab on the right side of the screen when a post is being edited.

For the Feature Images, use the subway images you’ve already imported into the Media Library.
“Bug” Alert…
If the Feature Image area for each post displays a Replace Image button, click it before adding the new Feature Image.
The reason you might need to do this is because the imported content actually had feature images in the previous site that it was in, before it (but not the original feature images) was imported here.
Doing This Quickly
In this, and a number of other exercises, I provide a large number of posts to import so that you work out ways to do bulk tasks efficiently.
Adding 25 feature images is probably fastest if you open all the posts in separate tabs, and use keyboard shortcuts to move between tabs, save the edit, then close the tab.
Task Four: Color Change
Set the background color of the site to black. You can do this in the Customizer. This is not a CSS change.
With this theme, the text color will automatically change to maintain accessible contrast.
Task Five: Add A Site Logo and Favicon
Use the Customizer to assign the white logo file as a site logo at the top of the page and the black one for the site icon (favicon).
Note: the images won’t need cropping, so you can chose Skip Cropping when prompted to crop.
This is what the logo will look like in the page (ignore the fact that this screenshot has “Contact Us” in the menu.
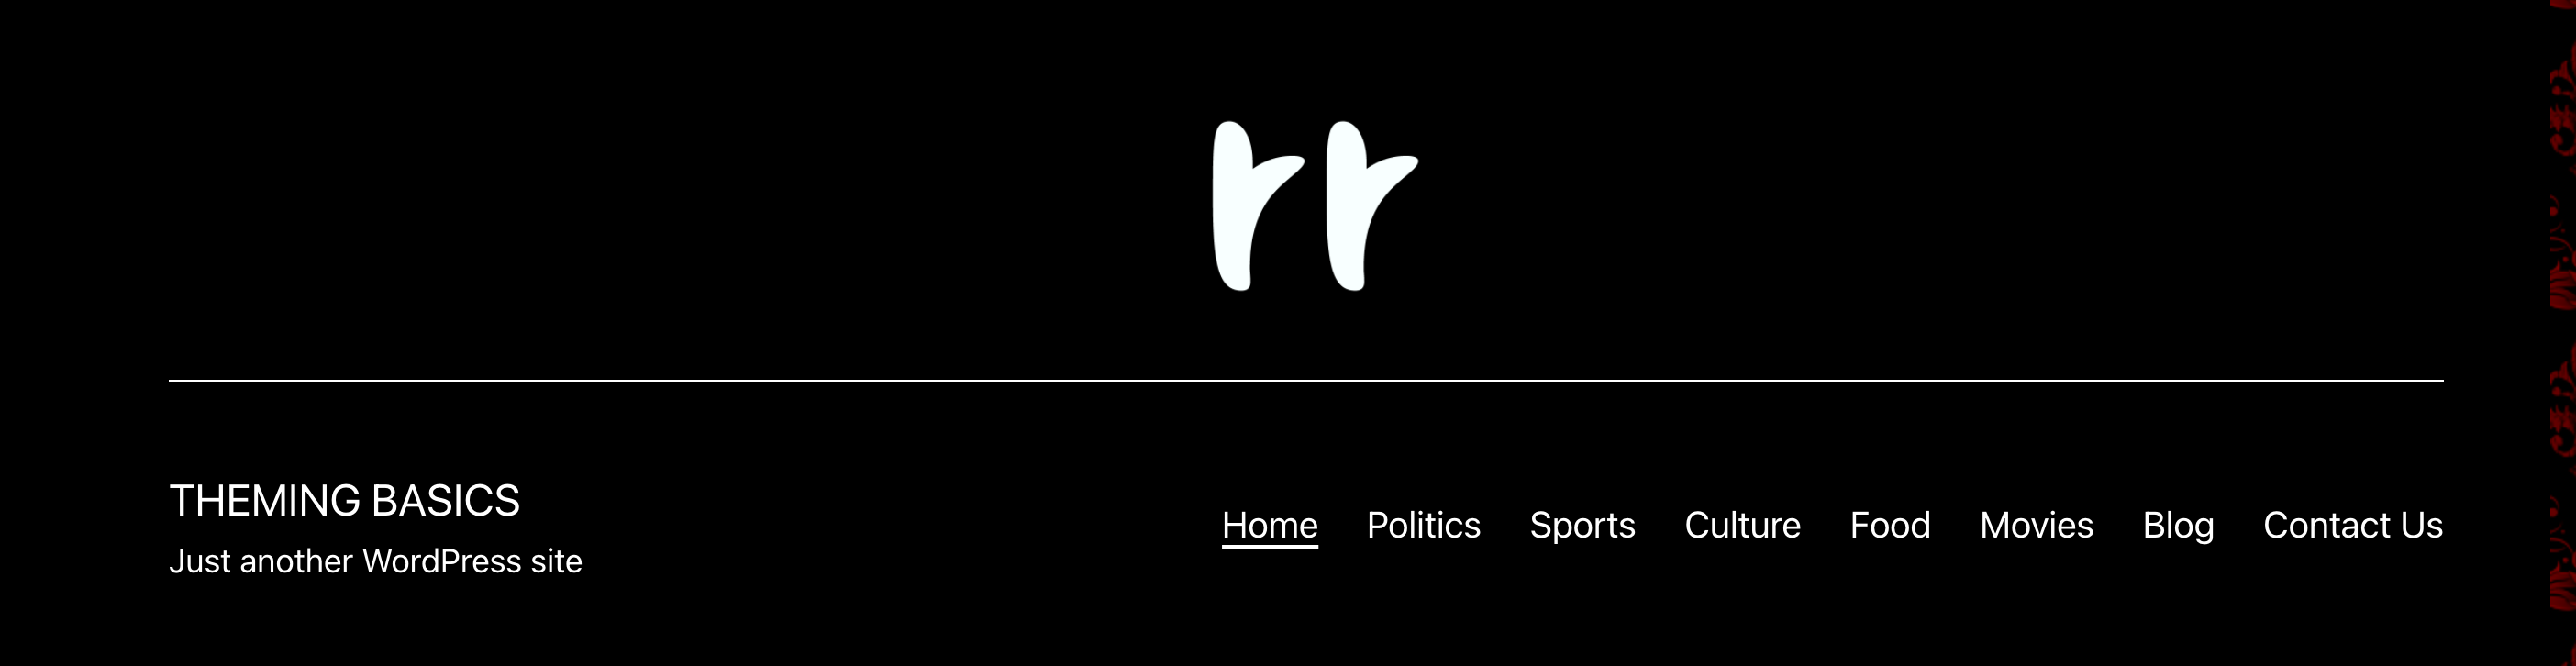
Make the necessary adjustment in the Customizer to have the top of the page appear like this:

Note: that’s not a CSS change.
Task Six: Media and Text Block
On the front page, after the second paragraph, use the Media and Text block to insert the “subway” image with the number 58 in the name. Then add the two lines of text beside it in the screenshot below.
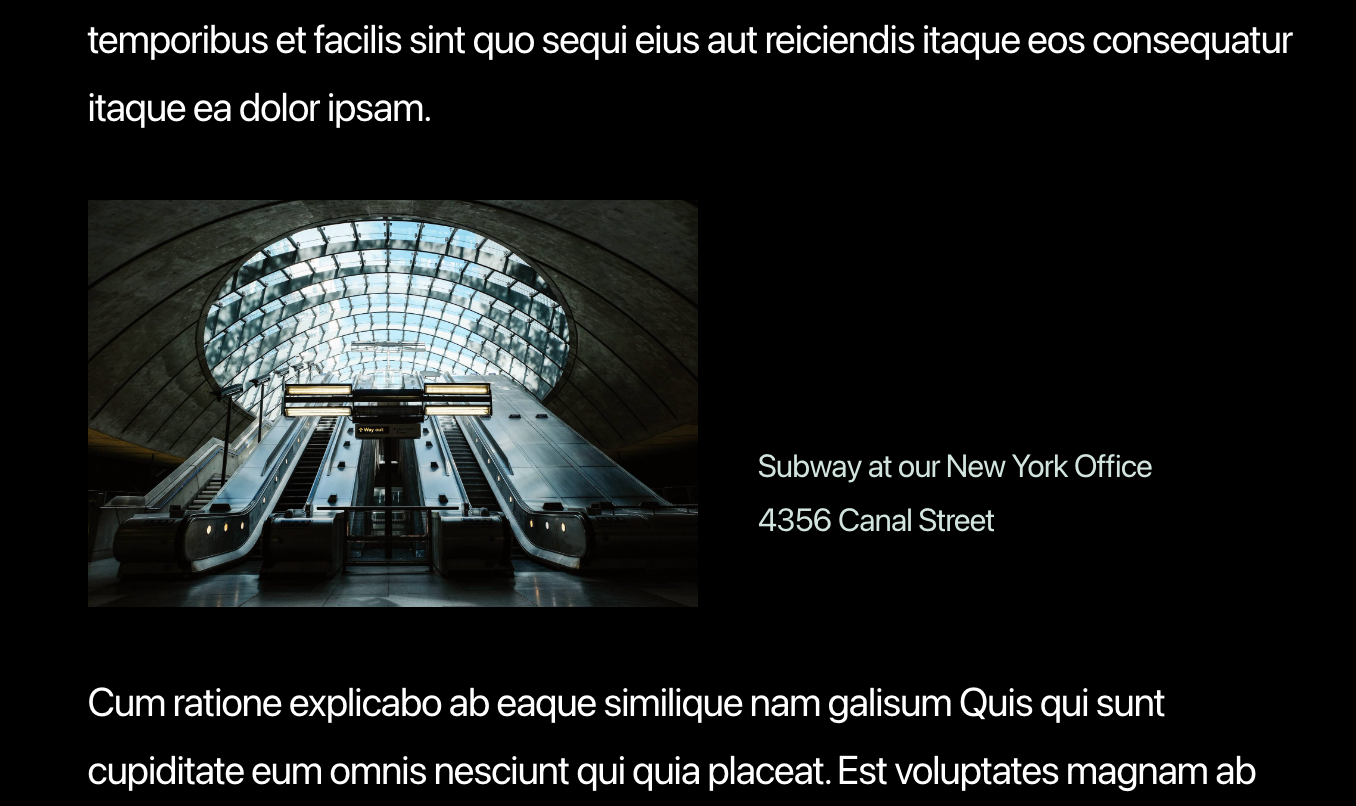
Make the text align near the bottom of the image, not the center or the top.
To do this, you will need to make sure that the Media and Text block is selected rather than either the media or the text. This is because layout methods like css grid and flex generally assign alignment settings to parents.
There are multiple ways to do this:
The Context Menu: clicking the first button in the context menu will select the parent block of the currently focussed block.

The Document Outline View: clicking the rightmost button in the array of buttons in the top left in the Dashboard will open the Document Outline, which allows you to quickly select, move, or duplicate any element on the page:

This is one of the most useful areas of WordPress, especially with FSE Themes, or when you are working with complex blocks.
Task Seven: Cover Block
Between paragraphs three and four, use the Cover Block to insert subway image 58 and put on top of the image the text content that is in the following screenshot:
Make the Cover Block go across the entire width of the screen. To do that, make sure that you have the Cover Block selected (see above).
Once you have done that, figure out a way to have the text not go all the way to the left (ie to have it align with the main text column in the page).
Finally, see if you can work out how to decrease the line-height of the list in the cover block.

Adjust the Image Focal Point: I chose the subway-58 image deliberately, in order to illustrate another feature of the Cover Block.
Notice the Mitry destination on the front of the subway car? It’s distracting from our own text.
To fix that, adjust the focus point of the image by going to the right sidebar and dragging the circle in the image.

Task Eight: The Editorial Team
After the last paragraph on the home page, use a Group block, a Heading block and the Columns block to create the following component.
The images will come from the Faces images you uploaded earlier.
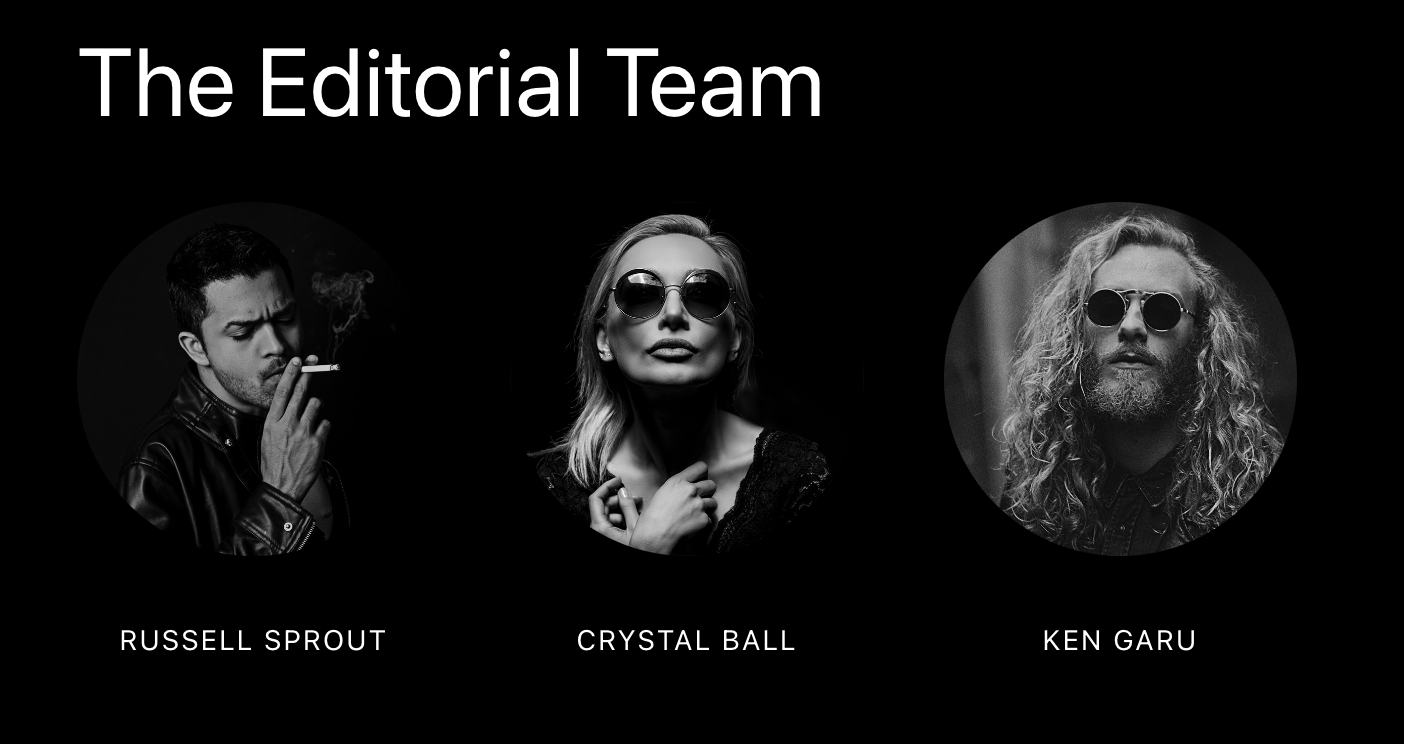
For this task, it’s probably easiest to make one column, and then duplicate it twice and then edit the copied columns.
You can easily duplicate items from the Document Overview sidebar on the left. Clicking on the three dots on the right of a block gives a contextual menu with many useful functions (including Duplicate).

Note, also, that I have here renamed the Group block. You can rename many, but not all blocks, from the same menu on the right (the “three dots” one).
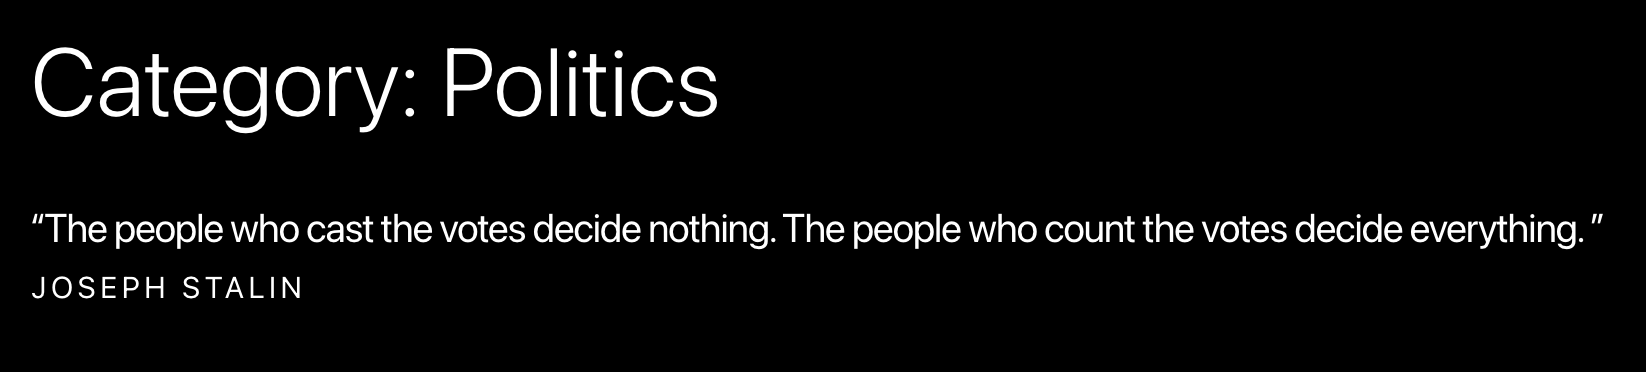
Task Nine: Add Category Descriptions
Add the following quotations (with credit) to the Category Descriptions fields. You can find that in the Posts area of the Dashboard.
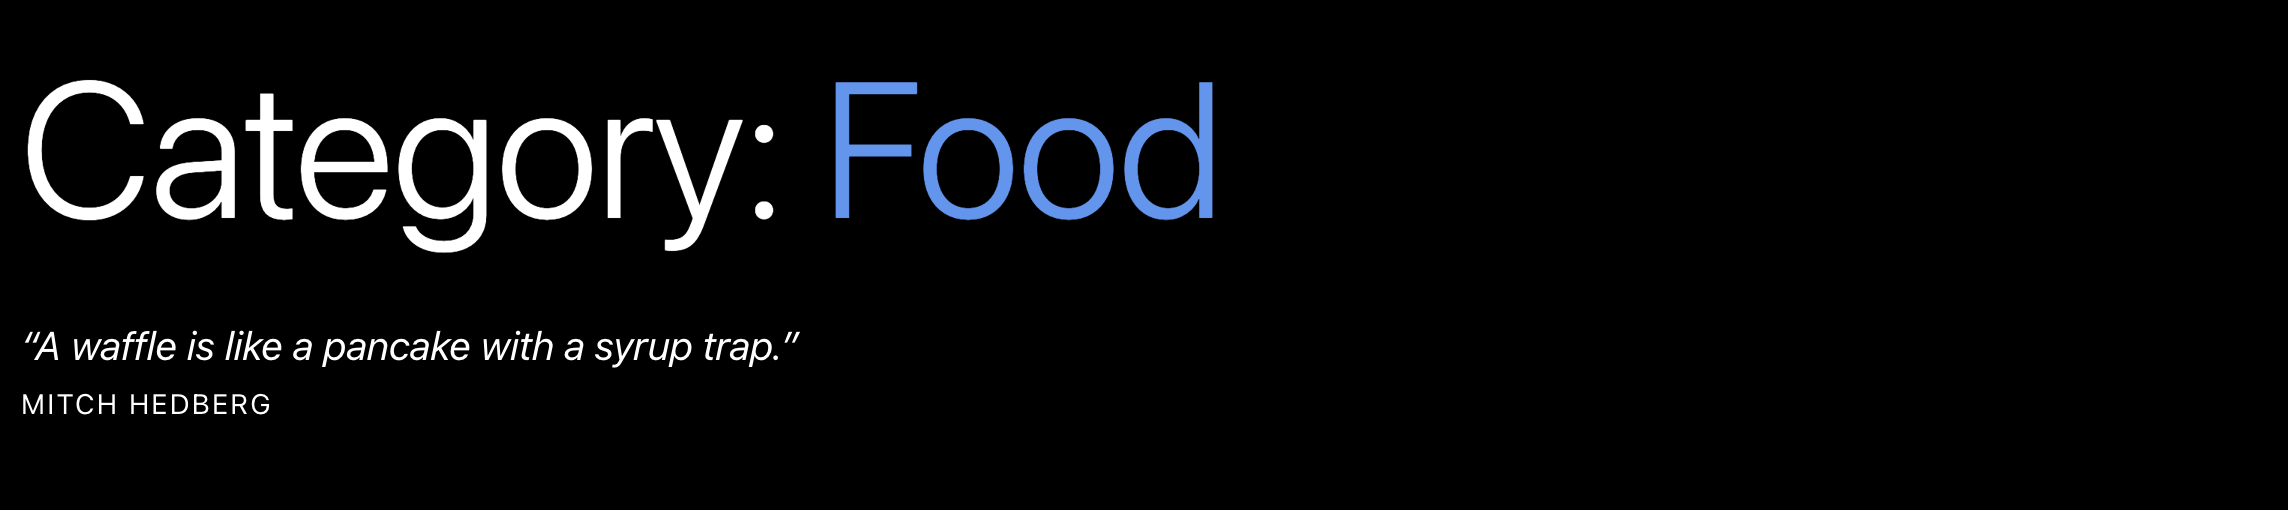
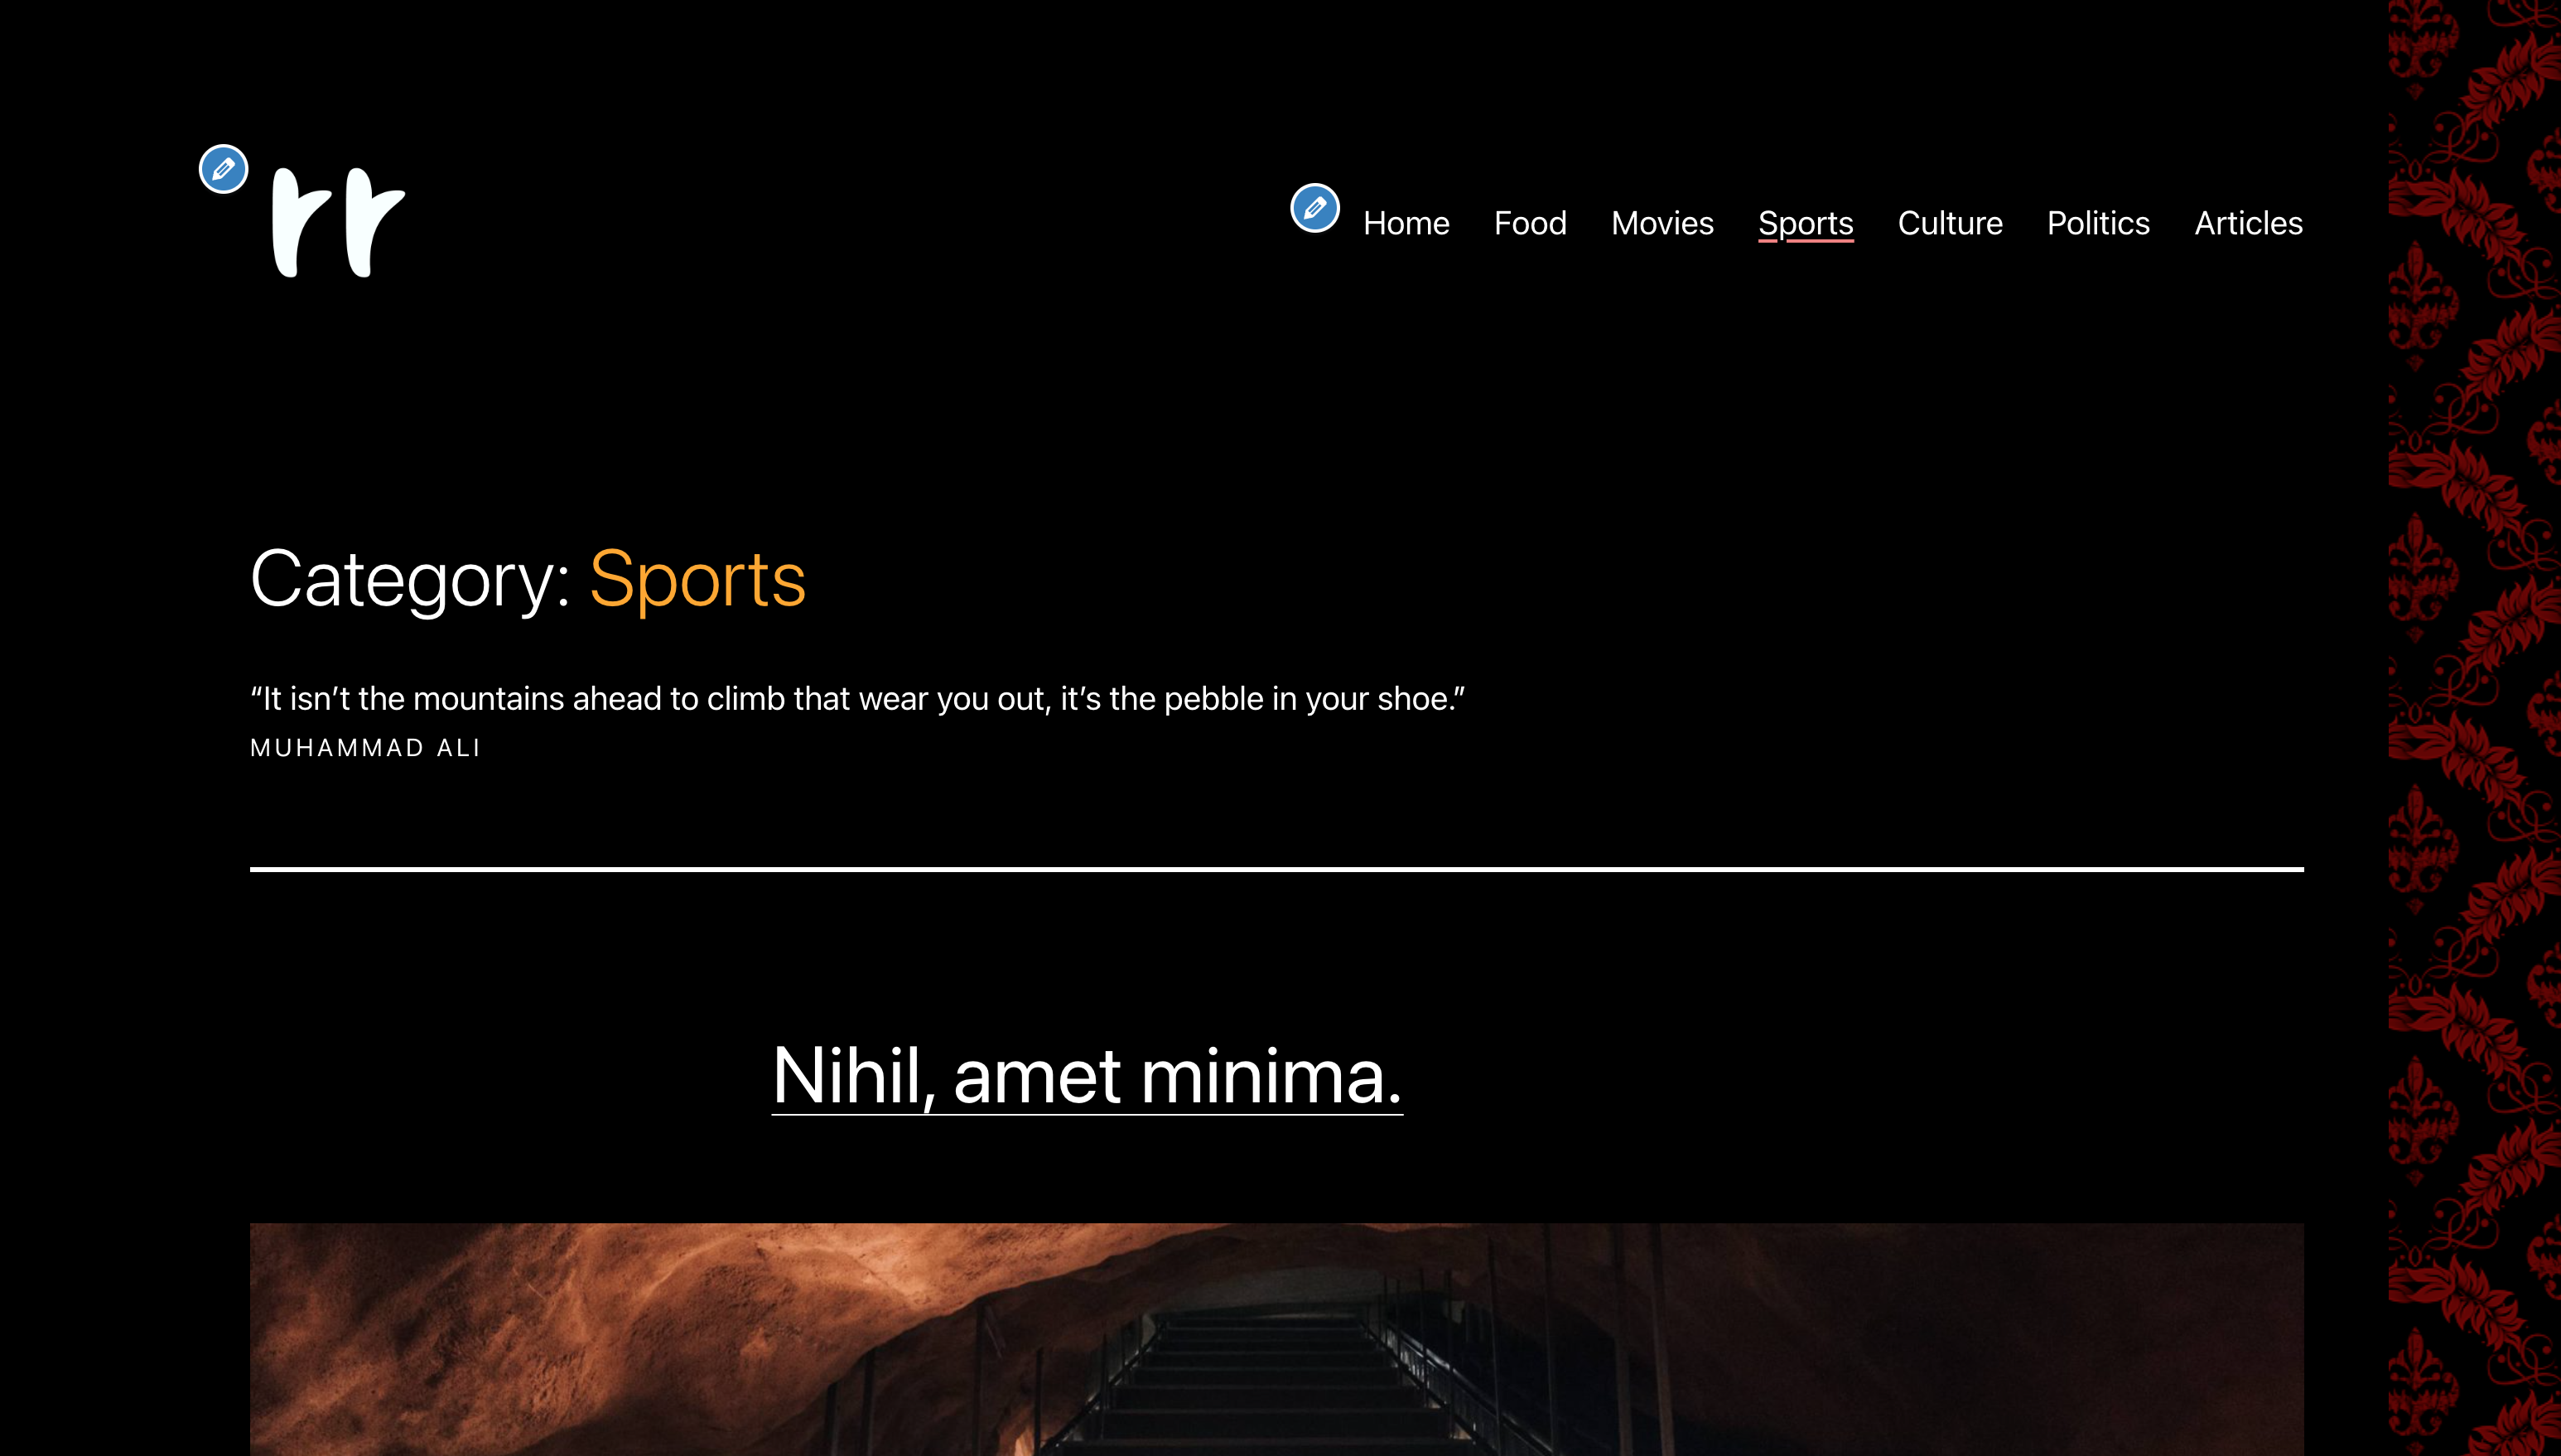
FOR THE SPORTS CATEGORY
“It isn’t the mountains ahead to climb that wear you out, it’s the pebble in your shoe.”

Muhammad Ali


FOR THE POLITICS CATEGORY
“The people who cast the votes decide nothing. The people who count the votes decide everything. ”

Joseph Stalin

FOR THE CULTURE CATEGORY
“Children are the vessels into which adults pour their poison.”

Salman Rushdie

FOR THE FOOD CATEGORY
“A waffle is like a pancake with a syrup trap.”

Mitch Hedberg


FOR THE MOVIES CATEGORY
"Cinema can fill in the empty spaces of your life and your loneliness."

Pedro Almodovar
Task Ten: Style The Category Descriptions
When you click on a category link, you will be taken to the archive for that category.
An archive is a collection of posts. Archive collections can be of many types, such as:
- all the posts in a category,
- all the posts tagged a particular way,
- all the posts by a certain author,
- all the posts from a certain date,
- etc
Not all themes will use the category description, but in this theme, the category description (if it exists in the database) is output at the top of each category archive.
While viewing your site, click a Category link in order to make sure that your category descriptions are being output by the theme.
Using the Custom CSS area of the Customizer, style the heading of the category archives and the category description like this:
Specifically:
- Set the page title on archives to 3rem font size.
- Set the category description to 1.25rem
- Set the credit for the quotation to .75em, with all caps and looser letter-spacing, as well as a small amount of margin-top.
Note that I used em units rather than rem units: this will make the credit 75% of the font-size of the parent element, rather than basing the size off of that of the body tag.
Your very best friend in figuring out how to make these changes is the browser inspector. In fact, without using the inspector, this task is very difficult.
It’s also easier if you inspect the page in a browser window in which the Customizer is not active: it adds lots of HTML and CSS to the page, so that can make figuring out what’s going on more difficult.
A Two-Minute video explaining that concept.
Task Eleven: Widget Configuration
Widgets are little “things” that let you add functionality to your site. Themes will typically make one or more areas in which the user can select widgets such as a search bar, a text or image block, a listing of recents, or a listing of categories, etc.
These areas were traditionally put in a sidebar of the site, but you will commonly find footer or header widget areas as well. This theme, for example, puts its widget area at the bottom of the page, not the side.
In August 2021, WordPress changed its widget format (so that widgets now will use Gutenberg blocks). If you have used widgets before then, the interface has changed but the concept is still the same.
Themes that have Full Site Editing (as of early 2023, there’s about 200 of them in the WP Theme Directory, as opposed to the approximately 5000 “classic” themes) do away with the widget area entirely.
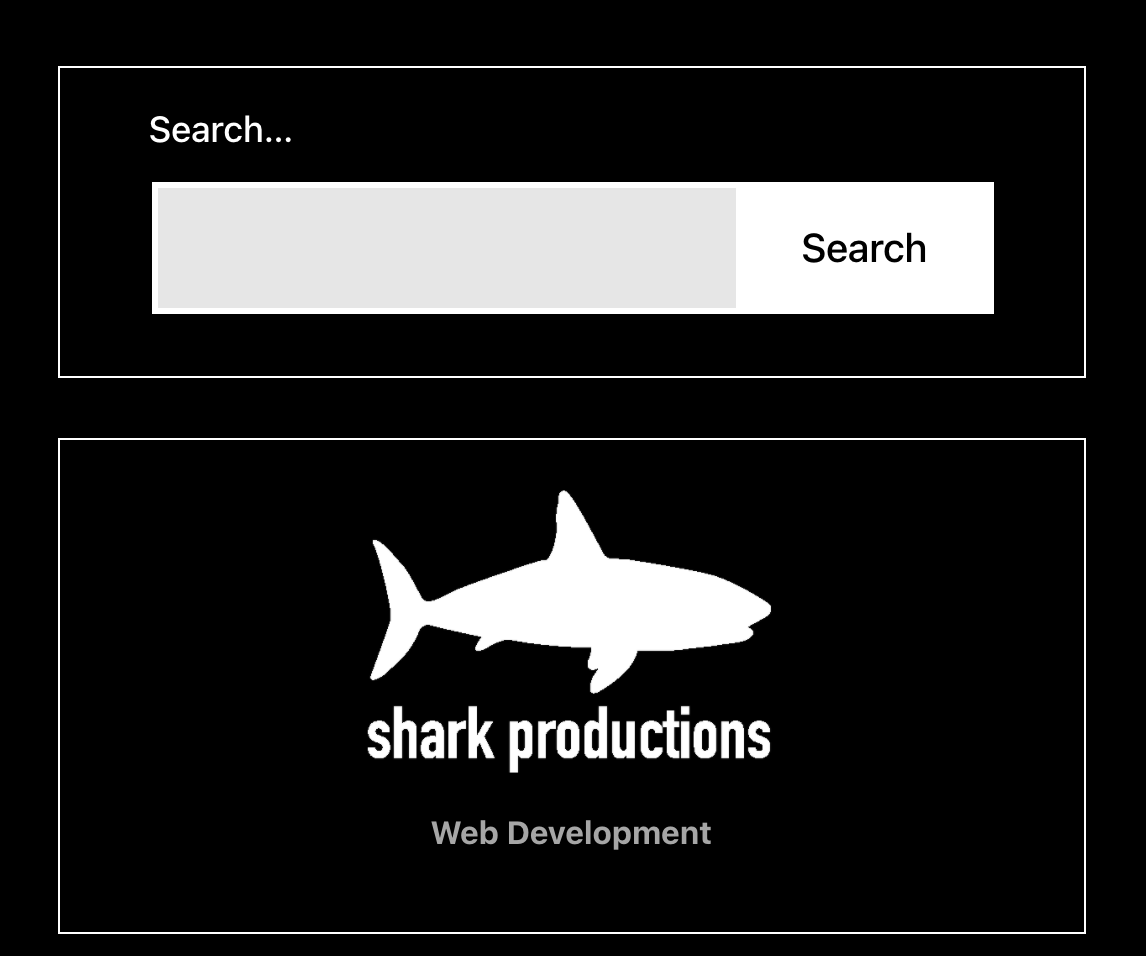
This is the theme’s default widget configuration, just above the footer:

Change it to look like this (wide screens)
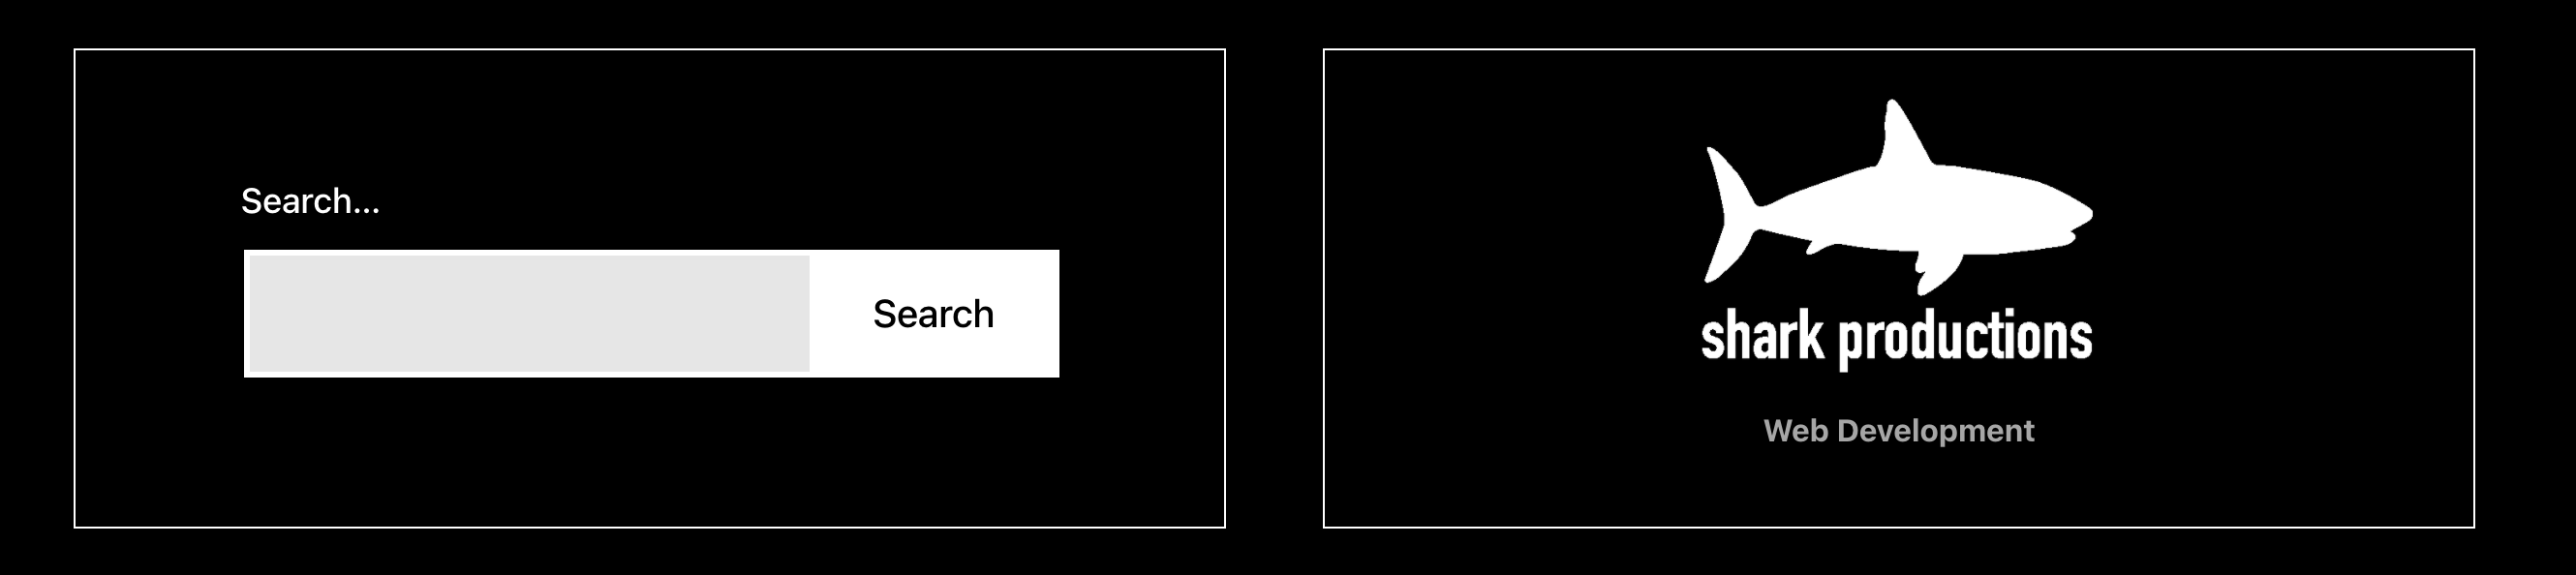
And like this (narrow screens).
You can access widgets from the Customizer, or from the Appearance section of the Dashboard.
However, if you go Appearance > Widgets, the UI gives significantly more room to work than if you go Appearance > Customize > Widgets.
To make the above changes, you will need to:
- Delete all of the default widgets, except for search.
- Download the shark productions logo (below), putting it into an image block widget.
- Scale the image down using the controls inside the widget: this will take some experimentation. By scaling down, you will be increasing the effective resolution, and thus fixing the very jaggy quality of this logo (made in about 2 minutes at least ten years ago).
- Make the shark productions image a link to Langara or Emily Carr.
- Make the necessary CSS changes to add the borders and responsive alignments seen in the screenshots above. This will require work with the browser developer tools.

Task Twelve: Style Self-Referential Menu Links
When on category archives pages (such as sports or culture or food), make the self-referential menu item have a lightcoral line underneath them.
By self-referential, I mean links that go to the same page you are on: they indicate where in the site you are.
This will require custom css.
Task Thirteen: Investigating Excerpts
Now click on Blog in the menu. This will take you to the listing of posts.
Scroll through the posts.
You will notice here that right after each post’s feature image, there is a paragraph of text. For the first post, that text will be the following:
The Vexter Fuzz Factory is a five-knob fuzz using two new old-stock sixties germanium transistors. It’s one of the most versatile Fuzz pedals on the market. Its circuit is not modeled after any classic fuzz design.
Click on the title or feature image of the most recent post: it will be at the top of the output of posts.
This will take you full (or “single”) view of the post. Here, you will notice that the paragraph you saw on the blog page is not visible.
That text came from the Excerpt field. An except is usually a summary of the content that you write. Not all themes will output summaries, but lots do. A very common pattern is to output excerpts in archives, search results, the home page, etc, and then to output the full content of the post when the post is viewed singly, on its own—after the user has clicked the post title in an archive or the home page, for example.
Custom excerpts typically make for a more pleasant reading experience than using any of the following:
- full content of all the post in the blog, home, page, or category archives.
- more buttons after the first paragraph
- summaries generated automatically by WordPress (by default the first 55 words in the post)
Click the Edit Post button at the top of the page (as long as you are logged in, of course).
Now figure out how to change the excerpt for the first post in the blog listing to
My name is [ your name ] and I created this excerpt. Excerpts are hand-crafted summaries of post contents. They typically work better than automatically-generated summaries.
Test that the excerpt is working, by clicking the blog link in the menu.
Task Fourteen: CSS Tweaks For Archive Titles
For the final css tweaks, click on Politics to go to the archive of all the posts from the politics category.
In the top part of the politics archive, change the color of the word politics to hotpink.
In their respective archive titles, change the category names to the following colors:
| Archive | Category Text Color |
|---|---|
| Politics | hotpink |
| Sports | orange |
| Culture | yellow |
| Food | cornflowerblue |
| Movies | darkseagreen |

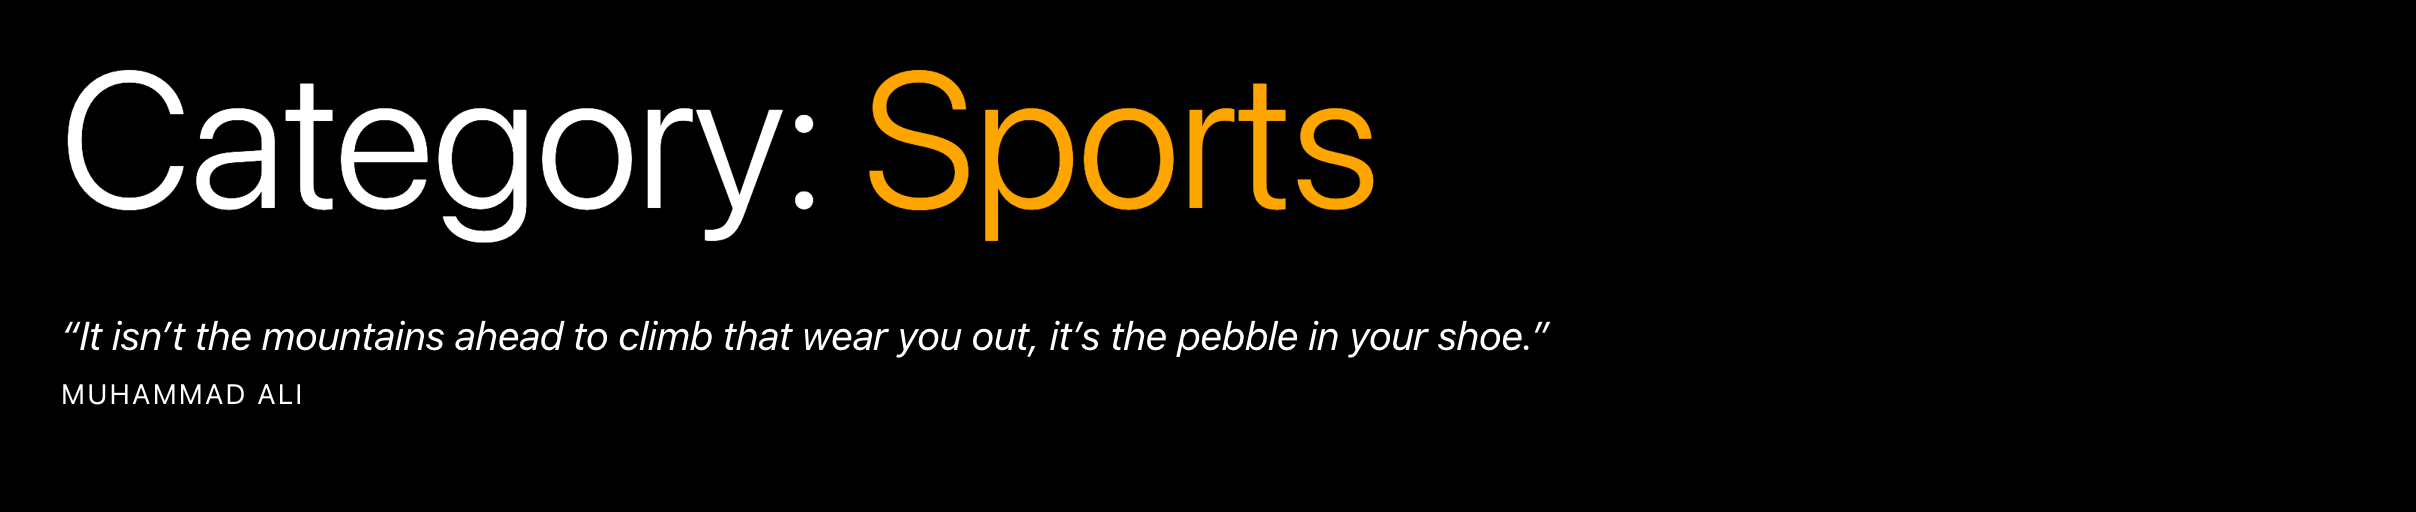

These tasks will require some custom CSS.
Big Hint: the body tag is your friend here….
Task Fifteen: Add A Background Pattern
From the DinPattern folder in the downloaded files, find the file entitled battle-royale and set it as the background image of the website. You can do this in the dashboard, in the theme customizer.
Make the background pattern repeat down the right side of the page only (ie vertically, not horizontally). That will take some custom CSS.
In other words, most of the background of the site will still be black: the image will only be on the far right side.
Make the necessary Custom CSS to make sure that this background image appears only when the window is at least 1500px wide.
Finally, make the necessary Custom CSS to make sure that only exactly half of the image shows on screen (when visible at all).
Hint 1: background-position-x
Hint 2: calc( )
How to Hand In Your Project
If you are an Emily Carr student, make me a Duplicator package.
If you installed the site using Duplicator, Duplicator is already installed.
If you used another method of installing the site, you will need to install the Duplicator plugin.
When you make a Duplicator package, it will create two files:
- installer.php
- a zip file with a very long name
Do not rename that zip file or the installation will break.
Download those files, then put them in a folder called yourname-sharkproductions
Then zip that folder.
This means that there will be a zip inside your zip. Totally fine.
Now, upload the zipped folder to Moodle.