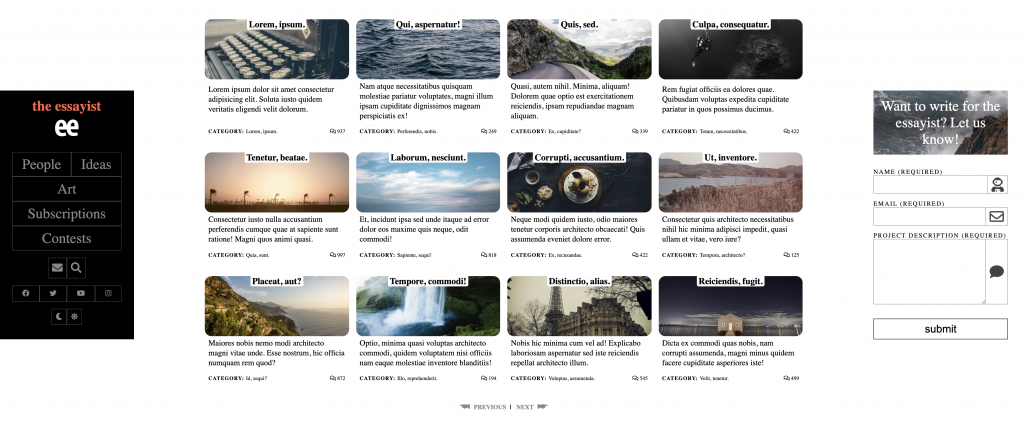
First, please download the screenshots and logo file.
In this exercise, you will make the front page of a magazine-style site.

There will be three main sections to the page: header, main, and footer.
All type will be the georgia, times, ‘times new roman’, serif font stack.
A short movie describing the task and showing how the page behaves.
Do Not Forget
Like Grid, Flex is all about parents and children. If a layout effect is not working out as you expect, make sure that you explicitly check your parent-child relationships.
As well, remember this: in life, you have parents. You might also have children. In flex, an element can be a flex-child, but it can also be a flex-parent arranging its own children.
A Resource
As usual, CSS Tricks has a great complete guide to flexbox.
Restrictions
In this exercise, you may not use the css position property.
You may use grid, but only within the main and its descendents. Not within the header or the footer.
All other layout must be done with flexbox.
Occasionally, some elements might need to change to block or inline-block. That’s fine.
The Header
The header will have the site title (the essayist), the logo, and four menus.
The h1 color is tomato (really).
The four menus will have these links:
- people, ideas, art, subscriptions, contests
- icons: contact, search
- icons: four social sites
- icons: sun & moon (for dark mode and light mode)
As always make the icon menus accessible.
All the links just need to be testing links. Hovering will change the link text or icon color to the tomato color used in the h1.
The Main Area
The main area will have 12 articles.
Each article will have:
- a title of two random words,
- a random photo from the picsum photo placeholder service,
- a paragraph of 15 words,
- a category indicator showing two random words,
- a number of comments indicator
How to make these articles quickly:
- use emmet shortcuts
- use Visual Studio Code multiple select functionality
To generate random images:
- use the following URL as the SRC of each article’s feature image:
https://picsum.photos/1200/500 - the above will give you the same image on the entire page.
Please ensure that all the images are unique. To do that, add this to the URL: ?random=number, where number is a unique number.
This number can be the emmet iteration (counter) number. - If you find that it takes too long to generate the random images on your Internet connection, just use a single number so that it’s the same image in every article.
To generate random numbers for the comments counter
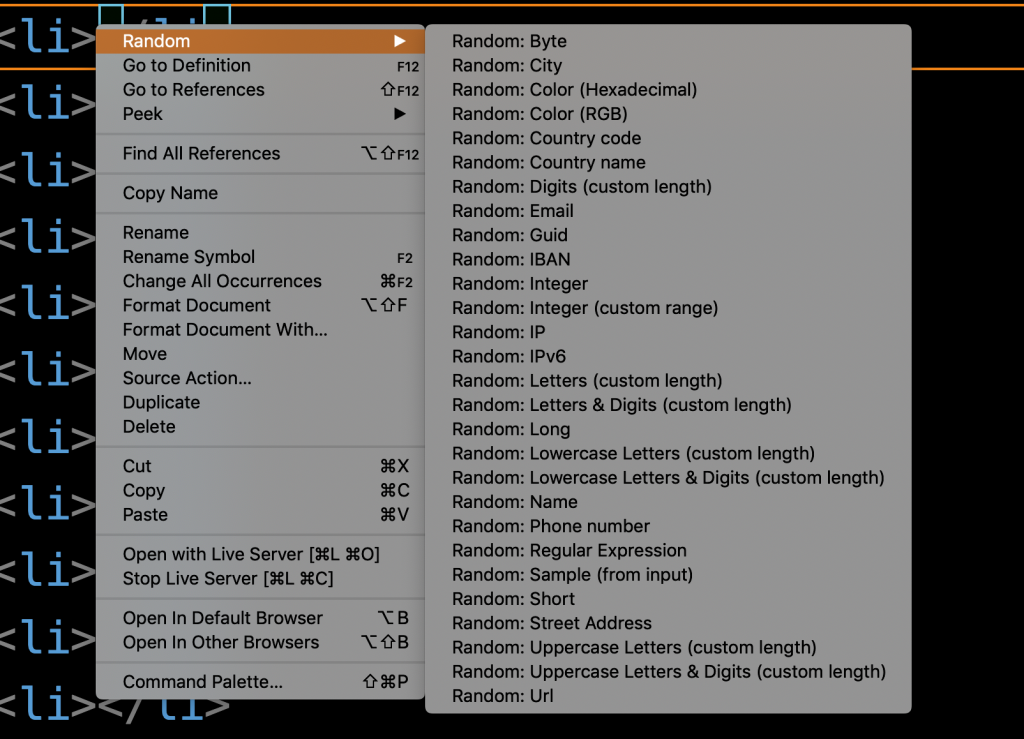
To make the random numbers that are in the comments indicators (as in the single-article screenshot), install the Visual Studio Code extension called VSCode-Random, which gives you a very useful command available in the command palette or by right-clicking:

Combine this functionality with multiple cursors.
The Footer Form
The footer has the form seen in the screenshots. The form has inputs for name and email, and a textarea for comments. Each has an associated icon.
The icon associated with the NAME field is an astronaut.
Examine the screenshots closely for clues on how to build this form.
Remember: no use of the position property.
Form Field Behavior
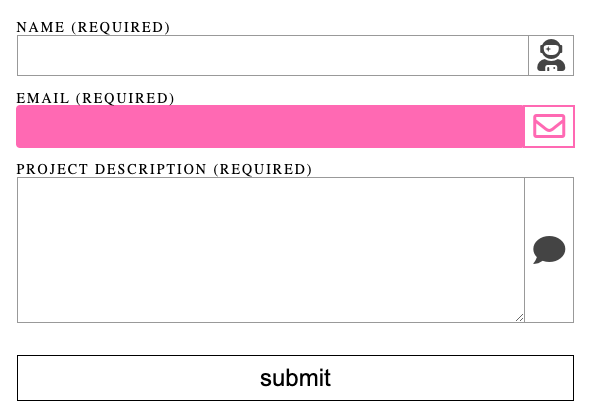
When an input or text area receives focus (ie is clicked in), the following visual indication occurs (see below).
The field, icon, and borders turn pink. The text inside the field will be white.
Your knowledge of advanced css selectors will be useful here.

Responsive States
There are a number of different responsive states, as shown in the screenshots:
- small
- medium-small
- medium
- medium-large
- large
- extra-large
Examine each to see what changes are required.
If your computer screen does not go very wide, use the Device Mode form the Chrome Inspect to simulate a larger screen.
When You are Done
If you’re a Langara online student: when done, please rename the site folder your-name-flex-essayist, then zip the folder and hand it into our Brightspace course.
If you’re an Emily Carr student: when done, when done, please rename the site folder your-name-flex-essayist, then zip the folder and hand it into our Moodle course shell.